
Biomes and Vegetation on Voxel Terrain in Babylon.js · Part 1 of 12 in the series
Part 1: Climate and biomes
Give the voxel world a climate: temperature and moisture from noise, six biomes as points on a climate chart, soft borders between them, colder biomes up the mountains, a map view that paints the ground in the biomes' colors, and a key that flies you to the next biome.
Biomes and Vegetation on Voxel Terrain in Babylon.jsPart 1 of 12
On this page
Quest objectives
- Know what this series adds to the voxel terrain and the blocks
- Make a climate from two noises, with borders that fray
- Turn a climate into the weights of six biomes
- Send the climate to the shader and work out the weights per pixel
- Paint the ground as a map, and fly from biome to biome
The smooth voxel terrain series made a world of hills, mountains and caves, and the building series put blocks on it. But wherever you walk, the world is the same meadow. This third series makes it different from place to place, and lets things grow on it: biomes with their own ground and their own shape of the land, a sea with lakes and beaches, grass, flowers, ferns and reeds, trees that grow from a few numbers, forests to the horizon, wind in all of it, and an axe.
It starts where the building series ended. Copy the finished project of its part 10 into a new folder: everything in it stays, the blocks, the chisel and the falling pieces too. This first part gives the world a climate and six biomes, and shows them as a map painted on the ground. Nothing grows yet, and the ground keeps its textures: those come in part 2.
Random numbers of their own
The climate needs seeded random numbers, as the terrain does, and from part 3 on the terrain will ask the climate how to shape the land. Two files that import each other are trouble, so seededRandom() moves out of src/terrain.ts into a file that both can import. Create src/random.ts:
/** Numbers that look random but are the same for the same seed (mulberry32). */
export function seededRandom(seed: number): () => number {
  return () => {
    seed = (seed + 0x6d2b79f5) | 0;
    let t = Math.imul(seed ^ (seed >>> 15), seed | 1);
    t ^= t + Math.imul(t ^ (t >>> 7), t | 61);
    return ((t ^ (t >>> 14)) >>> 0) / 4294967296;
  };
}
Delete the function from src/terrain.ts, and import it there instead: import { seededRandom } from './random.ts';. In src/textures.ts, the import now reads from './random.ts' too.
A climate from noise
A biome is a kind of land: a desert, a forest, a tundra. What decides which one a place is? In the real world, mostly two things: how warm it is, and how much rain falls. So the world gets two numbers for every place, a temperature and a moisture, both from 0 to 1, and both from noise that changes slowly: across a kilometer or two, not across a hill.
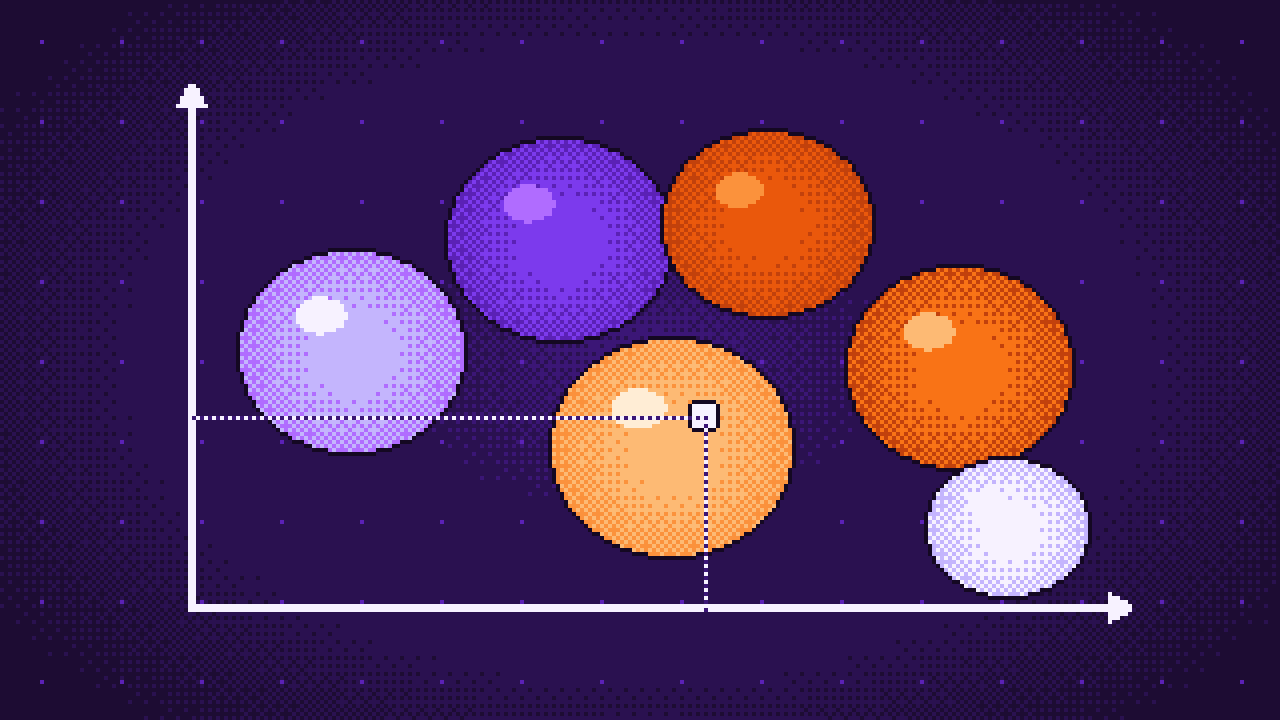
Then the biomes are points on a climate chart, with the temperature along one axis and the moisture along the other. The tundra sits at the cold end, the desert in the hot and dry corner, the broadleaf forest where it is mild and wet. A place belongs to the biome whose point is nearest to its own climate. That one rule gives a world that makes sense: a desert never borders a tundra, because on the chart other biomes lie between them, and the noise can't jump.
Create src/climate.ts:
import { createNoise2D } from 'simplex-noise';
import { seededRandom } from './random.ts';

// Noises of their own, so that the terrain's noise stays as it was.
const random = seededRandom(20261118);
const temperatureNoise = createNoise2D(random);
const moistureNoise = createNoise2D(random);
const borderNoise = createNoise2D(random);

/** Meters over which the noise of the temperature and of the moisture repeats its ups and downs. */
const TEMPERATURE_SCALE = 3000;
const MOISTURE_SCALE = 2200;
/** How much colder it gets per meter above the sea, on the scale from 0 to 1. */
export const COOLING = 0.004;

/** The climate of a place: 0 is the coldest or driest, 1 the hottest or wettest. */
export interface Climate {
  temperature: number;
  moisture: number;
}

/** Noise of about -0.8 … 0.8 as a number from 0 to 1. */
const toScale = (noise: number) => Math.min(Math.max(noise * 0.62 + 0.5, 0), 1);

/** The climate at sea level at (x, z). */
export function climateAt(x: number, z: number): Climate {
  // A finer noise frays the borders, which would be smooth curves without it.
  const frayX = borderNoise(x / 320, z / 320) * 0.07 + borderNoise(x / 90 + 50, z / 90) * 0.025;
  const frayZ = borderNoise(x / 320 - 80, z / 320 + 30) * 0.07 + borderNoise(x / 90, z / 90 - 50) * 0.025;
  // The numbers added to x and z move the noise, so that the start lies in a meadow
  // with every other biome within a kilometer.
  return {
    temperature: toScale(temperatureNoise(x / TEMPERATURE_SCALE + 8.41, z / TEMPERATURE_SCALE - 17.98) + frayX),
    moisture: toScale(moistureNoise(x / MOISTURE_SCALE - 16.56, z / MOISTURE_SCALE + 16.32) + frayZ),
  };
}

/** How much colder a place `height` meters above the sea is. */
export function cooling(height: number): number {
  return Math.max(height, 0) * COOLING;
}

/**
 * The biomes, each with the climate it is at home in and a color for the map. A place
 * belongs to the biome whose climate is nearest to its own.
 */
export const BIOMES = [
  { name: 'Meadow', temperature: 0.5, moisture: 0.4, color: '#7fae3c' },
  { name: 'Broadleaf forest', temperature: 0.52, moisture: 0.76, color: '#3c7a2a' },
  { name: 'Conifer forest', temperature: 0.3, moisture: 0.62, color: '#28584a' },
  { name: 'Tundra', temperature: 0.1, moisture: 0.45, color: '#c3ccd6' },
  { name: 'Savanna', temperature: 0.76, moisture: 0.5, color: '#c9a545' },
  { name: 'Desert', temperature: 0.86, moisture: 0.14, color: '#e8bd7c' },
] as const;

export const BIOME_COUNT = BIOMES.length;
/** The biomes by name, as their numbers in the list. */
export const Biome = { meadow: 0, broadleaf: 1, conifer: 2, tundra: 3, savanna: 4, desert: 5 } as const;

/** How far past a border, in climate, a biome still mixes with its neighbor. */
export const BLEND = 0.07;

/**
 * How much of each biome a climate is: 1 for the only biome deep inside it, shared out
 * near a border, and always 1 in sum. The weights are written into `weights`.
 */
export function biomeWeights(temperature: number, moisture: number, weights: Float32Array | number[]): void {
  let nearest = Infinity;
  for (let i = 0; i < BIOME_COUNT; i += 1) {
    const distance = Math.hypot(temperature - BIOMES[i].temperature, moisture - BIOMES[i].moisture);
    weights[i] = distance;
    nearest = Math.min(nearest, distance);
  }
  // A biome counts for as much as it is closer than BLEND beyond the nearest one.
  let sum = 0;
  for (let i = 0; i < BIOME_COUNT; i += 1) {
    const share = Math.max(1 - (weights[i] - nearest) / BLEND, 0);
    weights[i] = share * share;
    sum += weights[i];
  }
  for (let i = 0; i < BIOME_COUNT; i += 1) weights[i] /= sum;
}

/** The biome with the largest weight. */
export function mainBiome(weights: Float32Array | number[]): number {
  let main = 0;
  for (let i = 1; i < BIOME_COUNT; i += 1) if (weights[i] > weights[main]) main = i;
  return main;
}

/** The weights of the biomes at a place `height` meters above the sea. */
export function biomesAt(x: number, height: number, z: number, weights: Float32Array | number[]): void {
  const { temperature, moisture } = climateAt(x, z);
  biomeWeights(temperature - cooling(height), moisture, weights);
}
The three noises come from a random generator with a seed of its own. The terrain's generator is not touched, so the hills are exactly where they were.
climateAt()reads the two slow noises. Their borders would be smooth curves, which look drawn with a compass. So a third, finer noise is added first, once at 320 m and once at 90 m: it frays the borders.The numbers added to x and z only move the noise. They are picked so that the start lies in a meadow, with every other biome less than a kilometer away.
cooling()makes it colder the higher a place is: 0.4 less for every hundred meters. A meadow's mountain turns into conifer forest on its way up, and into tundra at the top, without any rule for mountains.BIOMESis the chart. Each biome also has a color for the map.
Weights instead of one biome
If every place were just its nearest biome, the borders would be lines: grass on one side, sand on the other. biomeWeights() gives every biome a weight instead. It measures how far the climate is from each biome's point. The nearest biome gets a share of 1. Another biome gets a share only if it is less than BLEND further away than the nearest one: the closer to a tie, the larger the share. The shares are squared, which rounds off the start of the blend, and divided by their sum, so that the weights always add up to 1.
Deep inside a biome, one weight is 1 and the others are 0. In a narrow strip along a border two biomes share the place, and where three meet, three do. biomesAt() puts both steps together for a place at a height, and mainBiome() picks the largest weight.
The climate goes to the shader
The ground is colored in the fragment shader, so the shader has to know the biomes of every pixel. The six weights could be worked out for every vertex and sent along. But weights don't blend well between vertices: they stay at 0 for a long way and then rise within a few meters, and where the mesh is coarse, as in the far view with its vertices a hundred meters apart, a border would smear over a whole triangle. The climate itself is smooth. So each vertex only carries its climate, two numbers, the graphics card blends them across the triangle, and the shader works out the weights from them for every pixel. The borders are sharp at any distance, and the mesh gets two numbers per vertex instead of six.
The chunks first. In src/chunks.ts, import climateAt from './climate.ts', and replace the interface ChunkMesh:
/**
 * A chunk's mesh, with how far below the ground each vertex lies, how much sky it sees,
 * and the climate at it: temperature and moisture, two numbers per vertex.
 */
export interface ChunkMesh extends MeshData {
  depths: Float32Array;
  light: Float32Array;
  climates: Float32Array;
}
The climate is read where the depth of each vertex is worked out. In buildChunk(), replace everything from the comment about the meters below the ground to the end of the function:
// Meters below the generated ground, for the material: soil first, then rock. And the
// climate, for the biome.
const { positions } = mesh;
const depths = new Float32Array(positions.length / 3);
const climates = new Float32Array(depths.length * 2);
for (let i = 0; i < depths.length; i += 1) {
  const x = origin.x + positions[i * 3];
  const y = origin.y + positions[i * 3 + 1];
  const z = origin.z + positions[i * 3 + 2];
  depths[i] = surfaceHeight(x, z) - y;
  const { temperature, moisture } = climateAt(x, z);
  climates.set([temperature, moisture], i * 2);
}
const vertexLight = lightAt(light!, origin, mesh.positions, mesh.normals);
return { mesh: { ...mesh, depths, light: vertexLight, climates }, light: keepLight ? light : null };
This is the climate at sea level. The cooling with the height is left to the shader, which knows the height of every pixel. The new array has to travel from the worker to the page like the others. In src/chunkWorker.ts, replace the list of buffers to hand over:
const transfer: Transferable[] = mesh
  ? [mesh.positions, mesh.normals, mesh.indices, mesh.depths, mesh.light, mesh.climates].map((array) => array.buffer)
  : [];
And the mesh gets it as an attribute. In src/world.ts, in createChunkMesh(), add after the line for the light: mesh.setVerticesData('climate', data.climates, false, 2);
The far view is ground too, and shows far more of the world than the chunks do. In src/farWorker.ts, import climateAt, and add a type for its mesh after FarJob:
/** The far ground's mesh, with the climate at each vertex. */
export interface FarMesh extends MeshData {
  climates: Float32Array;
}
Replace the loop that makes the positions:
const positions = new Float32Array(RINGS * SEGMENTS * 3);
const climates = new Float32Array(RINGS * SEGMENTS * 2);
for (let ring = 0; ring < RINGS; ring += 1) {
  const radius = INNER * growth ** ring;
  for (let segment = 0; segment < SEGMENTS; segment += 1) {
    const angle = (segment / SEGMENTS) * Math.PI * 2;
    const px = Math.cos(angle) * radius;
    const pz = Math.sin(angle) * radius;
    positions.set([px, surfaceHeight(x + px, z + pz) - SINK, pz], (ring * SEGMENTS + segment) * 3);
    const { temperature, moisture } = climateAt(x + px, z + pz);
    climates.set([temperature, moisture], (ring * SEGMENTS + segment) * 2);
  }
}
And the last two lines of the worker, which send the mesh:
const mesh: FarMesh = { positions, normals, indices, climates };
self.postMessage(mesh, { transfer: [positions.buffer, normals.buffer, indices.buffer, climates.buffer] });
In src/farView.ts, the mesh that arrives is a FarMesh now: import that type from './farWorker.ts' instead of MeshData from './meshData.ts', and use it in MessageEvent<FarMesh> and as the type of what show() takes. In show(), the climate follows the light:
mesh.setVerticesData('light', new Float32Array(count).fill(1), false, 1);
mesh.setVerticesData('climate', data.climates, false, 2);
The material
The shader needs the chart: the climate of each biome, and its color. Both go in as arrays of uniforms, so the list of biomes stays in one place, climate.ts. A third uniform switches the map on. In src/material.ts, import BIOMES from './climate.ts' and replace createTerrainMaterial():
/** The terrain's material: painted textures, projected from three sides, and lit. */
export function createTerrainMaterial(
  scene: Scene,
  textures: RawTexture2DArray,
  options: TerrainOptions,
): ShaderMaterial {
  const far = options.nearRadius !== undefined;
  const material = new ShaderMaterial(
    far ? 'far terrain' : 'terrain',
    scene,
    { vertexSource, fragmentSource },
    {
      attributes: ['position', 'normal', 'depth', 'light', 'climate'],
      uniforms: ['world', 'viewProjection', ...LIGHT_UNIFORMS, 'nearRadius', 'biomeClimates', 'biomeColors', 'mapView'],
      samplers: ['layers'],
      defines: far ? ['#define FAR'] : [],
    },
  );
  material.setTexture('layers', textures);
  setLight(material, options);
  // The biomes: the climate each is at home in, and its color on the map.
  material.setArray2('biomeClimates', BIOMES.flatMap((biome) => [biome.temperature, biome.moisture]));
  material.setArray3('biomeColors', BIOMES.flatMap((biome) => Color3.FromHexString(biome.color).asArray()));
  material.setFloat('mapView', 1);
  if (far) material.setFloat('nearRadius', options.nearRadius!);
  return material;
}
setArray2() and setArray3() take one flat list of numbers, two or three per biome. The attribute climate is new in the list of attributes, and the three uniforms in the list of uniforms. The vertex shader hands the climate on. Replace src/terrain.vertex.glsl:
precision highp float;

attribute vec3 position;
attribute vec3 normal;
attribute float depth;
attribute float light;
attribute vec2 climate;

uniform mat4 world;
uniform mat4 viewProjection;

varying vec3 vPosition;
varying vec3 vNormal;
varying float vDepth;
varying float vLight;
varying vec2 vClimate;

void main() {
  vec4 worldPosition = world * vec4(position, 1.0);
  vPosition = worldPosition.xyz;
  // Chunks are only moved, never turned or scaled, so the normal stays as it is.
  vNormal = normal;
  vDepth = depth;
  vLight = light;
  vClimate = climate;
  gl_Position = viewProjection * worldPosition;
}
Weights per pixel
In src/terrain.fragment.glsl, add varying vec2 vClimate; after the other varyings. After the uniforms, add the biomes:
// The biomes, as in climate.ts: the climate each is at home in, and its map color.
const int BIOMES = 6;
const float BLEND = 0.07;
const float COOLING = 0.004;
uniform vec2 biomeClimates[BIOMES];
uniform vec3 biomeColors[BIOMES];
// 1 paints the ground in the colors of the map.
uniform float mapView;
BLEND and COOLING are the constants of climate.ts again: the shader and the page must agree, or the HUD would name one biome while the ground shows another. The function is the same too, written in GLSL. Add it before main():
// How much of each biome a climate is, as biomeWeights() in climate.ts works it out.
void biomeWeights(vec2 climate, out float weights[BIOMES]) {
  float nearest = 10.0;
  for (int i = 0; i < BIOMES; i += 1) {
    weights[i] = distance(climate, biomeClimates[i]);
    nearest = min(nearest, weights[i]);
  }
  float sum = 0.0;
  for (int i = 0; i < BIOMES; i += 1) {
    float share = max(1.0 - (weights[i] - nearest) / BLEND, 0.0);
    weights[i] = share * share;
    sum += weights[i];
  }
  for (int i = 0; i < BIOMES; i += 1) weights[i] /= sum;
}
In main(), after the line that mixes in the snow, the pixel learns its biomes and takes the color of the map:
// The biomes of this spot, from its climate: the higher up, the colder.
float biomes[BIOMES];
biomeWeights(vec2(vClimate.x - max(vPosition.y, 0.0) * COOLING, vClimate.y), biomes);
vec3 mapColor = vec3(0.0);
for (int i = 0; i < BIOMES; i += 1) mapColor += biomeColors[i] * biomes[i];
// On the map, the textures only shade the color a little.
color = mix(color, mapColor * (0.5 + color.g), mapView);
The temperature drops with the pixel's own height, and from the weights comes one color: each biome's color times its weight. The texture underneath isn't thrown away: its green channel still shades the map a little, so that the ground keeps its grain. With mapView at 0, the ground looks as it did before.
From biome to biome
The biomes are a kilometer or two across. To see them all without a long walk, one key flies the camera to the next one. That needs a search: the nearest place that lies well inside a given biome. Create src/travel.ts:
import { BIOME_COUNT, biomesAt } from './climate.ts';
import { surfaceHeight } from './terrain.ts';

/** How far the search for a biome goes, and how far apart the places it tries are, in meters. */
const FARTHEST = 6000;
const STEP = 100;
/** A place counts only if the biome also holds this far around it. */
const AROUND = 120;

/**
 * The nearest place to (x, z) that lies well inside a biome: tried on rings around the
 * point, each STEP further out than the one before.
 */
export function findBiome(biome: number, x: number, z: number): { x: number; z: number } | null {
  const weights = new Float32Array(BIOME_COUNT);
  const holds = (px: number, pz: number) => {
    biomesAt(px, surfaceHeight(px, pz), pz, weights);
    return weights[biome] > 0.98;
  };
  for (let radius = STEP; radius <= FARTHEST; radius += STEP) {
    const steps = Math.ceil((radius * 2 * Math.PI) / STEP);
    for (let step = 0; step < steps; step += 1) {
      const angle = (step / steps) * Math.PI * 2;
      const px = x + Math.cos(angle) * radius;
      const pz = z + Math.sin(angle) * radius;
      if (!holds(px, pz)) continue;
      if (holds(px + AROUND, pz) && holds(px - AROUND, pz) && holds(px, pz + AROUND) && holds(px, pz - AROUND)) {
        return { x: px, z: pz };
      }
    }
  }
  return null;
}
The search tries places on rings around the camera, 100 m apart, each ring 100 m further out. A place counts if the biome has nearly all the weight there, at the height of the ground, and also 120 m to each side: a narrow tongue of a biome is not a place to visit. The first place found is the nearest.
Putting it together
In src/main.ts, import BIOME_COUNT, BIOMES, biomesAt and mainBiome from './climate.ts', and findBiome from './travel.ts'. The far view's material gets a name, since the map switches both materials. Replace the line that makes the far view:
const farMaterial = createTerrainMaterial(scene, textures, { ...fog, nearRadius });
const farView = new FarView(scene, farMaterial);
After the line let mode: 'walk' | 'fly' = 'walk';, add:
// The biome where the camera is, and the map that paints the ground in the biomes' colors.
const biomes = new Float32Array(BIOME_COUNT);
let biome = 0;
let mapView = true;

/** Flies to the nearest place of the biome after the one the camera is in. */
function travel(): void {
  const next = (biome + 1) % BIOME_COUNT;
  const place = findBiome(next, camera.position.x, camera.position.z);
  if (!place) return;
  mode = 'fly';
  camera.position.set(place.x, surfaceHeight(place.x, place.z) + 30, place.z);
}
travel() looks for the biome after the one the camera is in, and puts the flying camera 30 m above the ground there. Two keys go into the keydown handler, after the one for the mesher:
if (event.code === 'KeyG') {
  mapView = !mapView;
  for (const ground of [material, farMaterial]) ground.setFloat('mapView', mapView ? 1 : 0);
}
if (event.code === 'KeyN') travel();
Every frame, the biome under the camera is worked out, at the height of the ground there. In the render loop, after the line that reads the camera's position into x, y and z:
biomesAt(x, surfaceHeight(x, z), z, biomes);
biome = mainBiome(biomes);
The HUD names it, in a line after the coordinates: `Biome: ${BIOMES[biome].name}\n` +. In index.html, the title becomes Voxel biomes, and the help tells of the two new keys:
<div id="help">
  Click to look around · WASD walk, Shift run, Space jump · F fly (Q/E down/up) · B blocks:
  left break, right place, wheel or 1–6 material, , . size · C chisel: left cut, right sharp, R round or slope ·
  T terrain: left dig, right build, wheel size · M mesher · G map of the biomes · N fly to the next biome
</div>
Try it
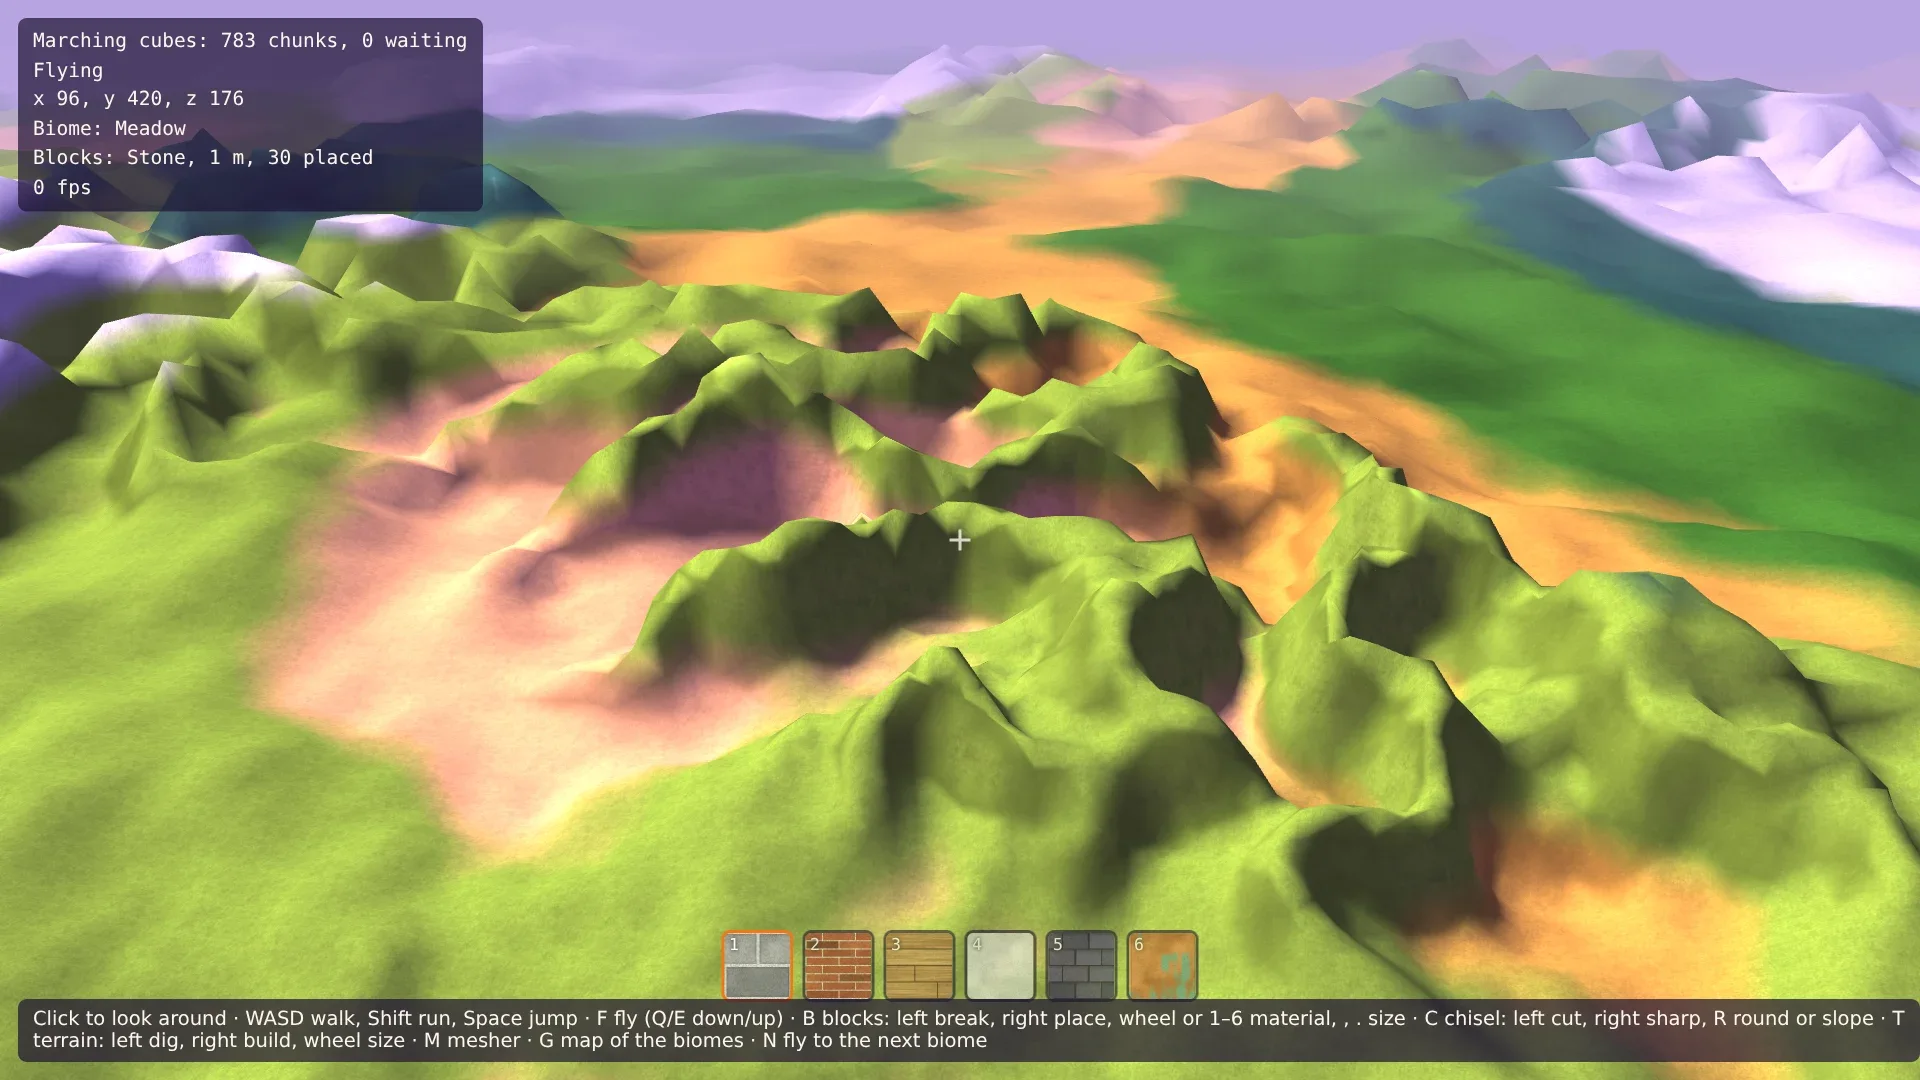
The demo starts with the map on: the meadow around you is light green. Press F to fly, go up with E, and look around. The dark green is broadleaf forest, the blue-green conifer forest, the pale grey tundra, the ochre savanna and the light sand color desert. Look at a mountain: its foot has the color of the land around it, and higher up it turns to conifer forest and tundra, because it is colder there. Press N a few times: each press flies you to the nearest place of the next biome, and the HUD names it. Fly low along a border and see how it frays. G switches the map off, and the ground is the old one everywhere: the biomes are only colors so far.
Comments
The comments are GitHub Discussions: sign in with GitHub to write one.
The comments come from GitHub, through giscus. Loading them sends your IP address to giscus.app and GitHub.