
Zero-Downtime Deployments for Node Apps With Docker Compose · Part 1 of 11 in the series
Part 1: A Guestbook Worth Deploying
See how the whole pipeline will work, then build the small app it deploys: a guestbook on Node.js with a PostgreSQL database, a test, and a first commit on GitHub or GitLab.
Zero-Downtime Deployments for Node Apps With Docker ComposePart 1 of 11
On this page

Quest objectives
- Understand why a normal update takes a site offline for a moment
- Know the five steps of the pipeline this series builds
- Run PostgreSQL in a container with Docker Compose
- Build a small web app with Node.js and Hono that stores its entries in the database
- Change the database with a migration and check your code with a test
- Push the project to GitHub or GitLab
Updating a website usually goes like this: stop the old version, start the new one. In between there is a gap. It may last one second or twenty, and whoever visits in that moment gets an error page. So updates are saved up for the evening, done in a hurry, and a little feared.
It does not have to be that way. In this series you build a small pipeline in which that gap does not exist: you push your code, and a minute or two later the new version is online, without one visitor noticing. You need no special tools for it, only Docker Compose, a short script, and GitHub or GitLab.

The plan
When the series is done, this happens every time you push to your repository:
The pipeline tests and builds. GitHub or GitLab runs your tests. If they pass, it packs the app into an image, a package that holds the app and everything it needs to run.
The image goes on a shelf. Both platforms keep images for you. The newest one gets the label
production.The server looks at the shelf. Once a minute your server asks whether
productionis a new image. Nobody logs in to the server, and the pipeline holds no key to it.The server swaps without a gap. It starts the new version beside the old one, waits until the new one proves it works, sends the visitors there, and only then lets the old one finish and leave.
If something is wrong, the old version stays. A new version that does not start properly never sees a visitor, and one that turns out bad later can be taken back with one click.
The series builds this from the inside out. Parts 1 to 3 make the app and its image. Part 4 adds the pipeline, parts 5 and 6 the server. Part 7 is the heart of it, the swap without a gap, and part 8 lets the server do it by itself. Parts 9 to 11 are about the days when things go wrong: failed deploys, changes to the database, and a message that tells you what happened.
What you need
Node.js, version 26 or newer.
Docker with Docker Compose. Docker Desktop brings both, on Linux the normal Docker packages do.
Git, and an account on GitHub or GitLab. The free plans are enough.
A terminal. The commands are written for Linux and macOS. On Windows, use WSL, which gives you a Linux terminal.
Check what you have:
$ node --versionv26.13.0$ docker --versionDocker version 29.9.2, build a82e528$ git --versiongit version 2.53.0
From part 5 on you also need a small rented server, which costs a few euros a month, and a domain or subdomain that you can point at it. Until then everything happens on your own computer.
GitHub or GitLab?
The series works with both, and for most steps it makes no difference. Where it does, you find a switch like the one below. Pick your platform once: the choice is remembered, on every page of the series.
Start by creating an empty repository for the project:
GitHub
On GitHub, click the + at the top right and choose New repository. Name it guestbook, set it to Private, and leave everything else as it is: no README, no .gitignore, no license. The repository has to be empty, because you will push your own first commit to it at the end of this part.
GitLab
On GitLab, click the + at the top left and choose New project/repository, then Create blank project. Name it guestbook, set the visibility to Private, and untick Initialize repository with a README. The repository has to be empty, because you will push your own first commit to it at the end of this part.
The project
The app is a guestbook: visitors leave their name and a message, and the page shows what others wrote. That is small enough to read in a few minutes, and it has what makes deploying interesting: a database that must not lose anything, and requests that must not be cut off.
Create a folder for it where you keep your projects (the series uses ~/projects), with Git and three subfolders:
$ mkdir guestbook && cd guestbook$ git init --initial-branch=main$ mkdir src migrations test
Create package.json in the new folder:
{
  "name": "guestbook",
  "version": "1.0.0",
  "private": true,
  "type": "module",
  "scripts": {
    "dev": "node --env-file=.env --watch src/server.js",
    "migrate": "node --env-file=.env src/migrate.js",
    "start": "node src/server.js",
    "test": "node --test"
  },
  "dependencies": {
    "@hono/node-server": "^2.1.9",
    "hono": "^4.13.19",
    "pg": "^8.23.1"
  }
}
"type": "module" lets the files use import and export. The app is plain JavaScript, so there is nothing to compile. The four scripts are shortcuts:
npm run devstarts the app for working on it: it reads the settings from a file called.envand restarts whenever you save a file.npm run migratebrings the database up to date. More on that in a moment.npm startstarts the app without any extras.npm testruns the tests, with the test runner that is built into Node.js.
The app needs three packages: Hono, a small framework for web apps, @hono/node-server, which lets Hono run on Node.js, and pg, which talks to PostgreSQL. Install them:
$ npm installadded 16 packages, and audited 17 packages in 995msfound 0 vulnerabilities
npm has also written a file called package-lock.json. It notes the exact version of every package, so the pipeline and the server later install exactly what you have now. It belongs in the repository. Two other things do not, and .gitignore keeps them out:
node_modules
.env
The database
The entries live in PostgreSQL, a database. You do not have to install it: it runs in a container, a program that is fenced off from the rest of your computer and brings everything it needs. Docker Compose starts containers from a description in a file. Create compose.yml:
services:
  db:
    image: postgres:18-alpine
    ports:
      - '5432:5432'
    environment:
      POSTGRES_USER: guestbook
      POSTGRES_PASSWORD: guestbook
      POSTGRES_DB: guestbook
    volumes:
      - db-data:/var/lib/postgresql
    healthcheck:
      test: ['CMD-SHELL', 'pg_isready -U guestbook']
      interval: 5s
      timeout: 3s
      retries: 10

volumes:
  db-data:
This describes one service called db:
imageis what to run: PostgreSQL 18.portsmakes the database reachable from your computer, on port 5432.environmentsets the user, the password and the name of the database it creates on its first start. A password like this one is fine on your own computer. The server gets a real one.volumesgives the data a place outside the container, so it survives when the container is replaced.healthcheckasks the database every five seconds whether it is ready. You will see in part 3 what that is good for.
The app has to know where the database is. It reads that from an environment variable, and on your computer the variable comes from the file .env:
DATABASE_URL=postgres://guestbook:guestbook@localhost:5432/guestbookThe address names the user, the password, the computer, the port and the database. Settings like this differ between your computer and the server, which is why they are kept out of the code, and out of Git.
A new database is empty. The table for the entries is created by a migration: a numbered file with a change to the database, which runs exactly once. Create migrations/001-create-entries.sql:
create table entries (
  id serial primary key,
  name text not null,
  message text not null,
  created_at timestamptz not null default now()
);
Every later change to the database will be another file in this folder. A small script runs the ones that have not run yet. Create src/migrate.js:
import { readdir, readFile } from 'node:fs/promises';
import { pool } from './db.js';

/**
 * Brings the database up to date: runs every file in migrations/ that has not run yet, in
 * the order of their names, and notes each one in the table "migrations".
 */
const folder = new URL('../migrations/', import.meta.url);

await pool.query(
  'create table if not exists migrations (name text primary key, applied_at timestamptz not null default now())',
);
const { rows } = await pool.query('select name from migrations');
const applied = new Set(rows.map((row) => row.name));

const files = (await readdir(folder)).filter((name) => name.endsWith('.sql')).sort();

for (const name of files) {
  if (applied.has(name)) continue;

  const sql = await readFile(new URL(name, folder), 'utf8');
  const client = await pool.connect();
  try {
    // All or nothing: a migration that fails halfway leaves no trace.
    await client.query('begin');
    await client.query(sql);
    await client.query('insert into migrations (name) values ($1)', [name]);
    await client.query('commit');
    console.log(`Applied ${name}`);
  } catch (error) {
    await client.query('rollback');
    throw error;
  } finally {
    client.release();
  }
}

console.log('Database is up to date');
await pool.end();
The script keeps its own notes in a table called migrations. It reads the folder, sorts the files by name, skips those it has noted, and runs the rest. Each one runs in a transaction, between begin and commit: if anything in the file fails, the database is left exactly as it was before. You can run the script as often as you like. That matters, because from part 7 on the server runs it before every deploy.
It imports pool from a file that does not exist yet. Create src/db.js:
import pg from 'pg';

/** A pool keeps a few connections to the database open and hands them out per query. */
export const pool = new pg.Pool({ connectionString: process.env.DATABASE_URL });

export async function listEntries() {
  const { rows } = await pool.query(
    'select name, message, created_at from entries order by created_at desc limit 50',
  );
  return rows;
}

export async function addEntry({ name, message }) {
  await pool.query('insert into entries (name, message) values ($1, $2)', [name, message]);
}
This is everything the app ever asks of the database: the newest fifty entries, and adding one. The $1 and $2 are placeholders. The values travel separately from the query, so a visitor cannot smuggle a command of their own into it.
Start the database and run the migration:
$ docker compose up --detach$ npm run migrate> guestbook@1.0.0 migrate> node --env-file=.env src/migrate.jsApplied 001-create-entries.sqlDatabase is up to date
The app
Four short files are left. The first one decides whether an entry is acceptable. Create src/entries.js:
/** Checks what a visitor sent. Returns the cleaned entry, or the reason it was refused. */
export function cleanEntry(input) {
  const name = String(input.name ?? '').trim();
  const message = String(input.message ?? '').trim();

  if (!name) return { error: 'Please tell us your name.' };
  if (name.length > 40) return { error: 'Your name can have up to 40 characters.' };
  if (!message) return { error: 'Please write a message.' };
  if (message.length > 500) return { error: 'Your message can have up to 500 characters.' };

  return { entry: { name, message } };
}
This is the one piece of real logic in the app, and it is kept apart from the database and the web on purpose: a function that only takes a value and returns a value is the kind you can test in a millisecond.
Next, the page. Create src/page.js:
import { html } from 'hono/html';

/** The whole page. `html` escapes everything it is given, so a visitor cannot sneak in markup. */
export const page = ({ entries, error, version }) => html`<!doctype html>
<html lang="en">
  <head>
    <meta charset="utf-8" />
    <meta name="viewport" content="width=device-width, initial-scale=1" />
    <title>Guestbook</title>
    <style>
      body { font-family: system-ui, sans-serif; max-width: 36rem; margin: 2rem auto; padding: 0 1rem; }
      form { display: grid; gap: 0.5rem; margin-bottom: 2rem; }
      input, textarea, button { font: inherit; padding: 0.5rem; }
      li { margin-bottom: 1rem; }
      .error { color: #b91c1c; }
      footer { color: #6b7280; font-size: 0.875rem; }
    </style>
  </head>
  <body>
    <h1>Guestbook</h1>
    <form method="post" action="/entries">
      <input name="name" placeholder="Your name" maxlength="40" required />
      <textarea name="message" placeholder="Your message" maxlength="500" required></textarea>
      <button>Sign the guestbook</button>
      ${error ? html`<p class="error">${error}</p>` : ''}
    </form>
    <ul>
      ${entries.map(
        (entry) => html`<li><strong>${entry.name}</strong> wrote:<br />${entry.message}</li>`,
      )}
    </ul>
    <footer>Version ${version}</footer>
  </body>
</html>`;
One function builds the whole page: the form, the list of entries, and a footer with a version. html comes from Hono and escapes every value that is put into the page, so a message containing <script> shows up as text instead of running in other visitors' browsers.
The app itself connects the two. Create src/app.js:
import { Hono } from 'hono';
import { addEntry, listEntries } from './db.js';
import { cleanEntry } from './entries.js';
import { page } from './page.js';

/** Which build this is. The pipeline bakes the commit into the image; locally it is "dev". */
const version = (process.env.APP_VERSION ?? 'dev').slice(0, 7);

export const app = new Hono();

app.get('/', async (c) => c.html(page({ entries: await listEntries(), version })));

app.post('/entries', async (c) => {
  const { entry, error } = cleanEntry(await c.req.parseBody());
  if (error) return c.html(page({ entries: await listEntries(), error, version }), 400);

  await addEntry(entry);
  return c.redirect('/', 303);
});
Two addresses: a request for / gets the page with the entries, and the form sends its content to /entries. There, an entry that cleanEntry refuses brings the page back with the reason. A good one is saved, and the browser is sent back to the page. The 303 tells it to fetch the page afresh, so reloading does not send the form a second time.
Look at the line with version. It reads an environment variable called APP_VERSION and keeps its first seven characters. The pipeline will later put the ID of the commit there, and the footer of the page shows it. So whenever a new version goes online, you will see it in the browser. On your computer the variable is not set, and the footer says dev.
The last file starts the server. Create src/server.js:
import { serve } from '@hono/node-server';
import { app } from './app.js';

const port = Number(process.env.PORT ?? 3000);

serve({ fetch: app.fetch, port }, () => {
  console.log(`Guestbook listening on port ${port}`);
});
Start the app:
$ npm run dev> guestbook@1.0.0 dev> node --env-file=.env --watch src/server.jsGuestbook listening on port 3000
Open localhost:3000 and sign your guestbook:
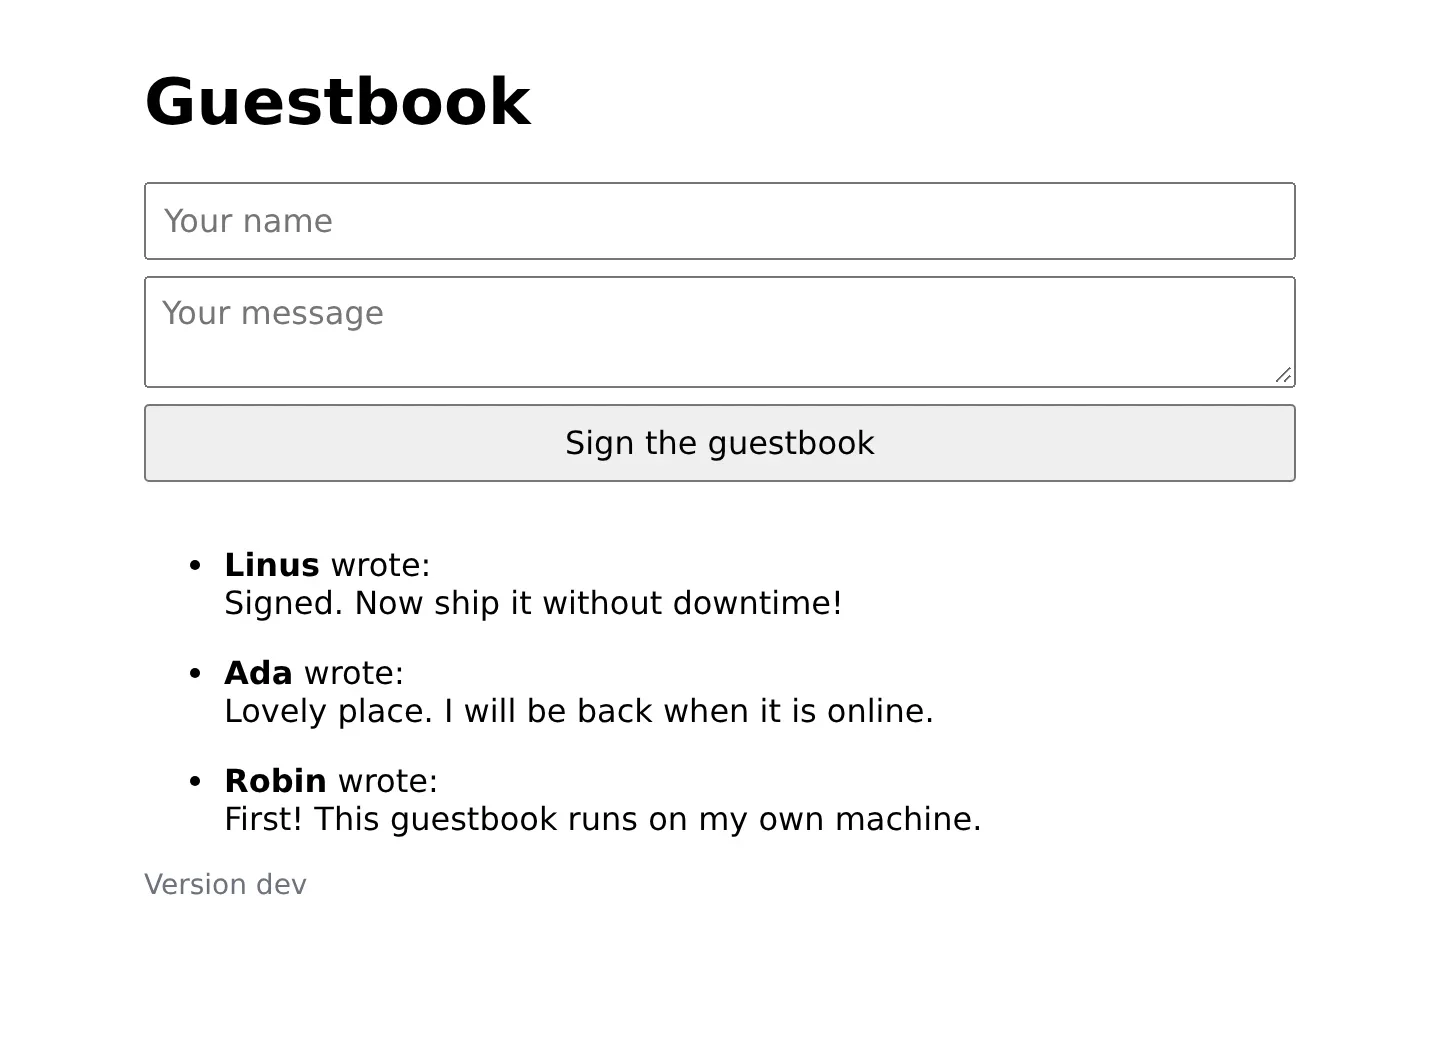
The terminal stays busy with the app. For the next commands, open a second one in the same folder, or stop the app with Ctrl+C.
A test
A pipeline that deploys by itself needs something that tells it when the code is broken. That is what tests are for. Create test/entries.test.js:
import assert from 'node:assert/strict';
import { test } from 'node:test';
import { cleanEntry } from '../src/entries.js';

test('accepts a name and a message', () => {
  const { entry } = cleanEntry({ name: ' Robin ', message: 'Hello!' });
  assert.deepEqual(entry, { name: 'Robin', message: 'Hello!' });
});

test('refuses an empty message', () => {
  const { error } = cleanEntry({ name: 'Robin', message: '   ' });
  assert.equal(error, 'Please write a message.');
});

test('refuses a name that is too long', () => {
  const { error } = cleanEntry({ name: 'x'.repeat(41), message: 'Hello!' });
  assert.equal(error, 'Your name can have up to 40 characters.');
});
Each test calls cleanEntry with an example and says what must come out. Run them:
$ npm test> guestbook@1.0.0 test> node --test✔ accepts a name and a message (1.405265ms)✔ refuses an empty message (0.152699ms)✔ refuses a name that is too long (0.111174ms)ℹ tests 3ℹ suites 0ℹ pass 3ℹ fail 0ℹ cancelled 0ℹ skipped 0ℹ todo 0ℹ duration_ms 67.604609
Three tests are not many, but the principle is what counts: the pipeline will run exactly this command before it builds anything. If one test fails, nothing gets deployed.
The first commit
Put everything into Git:
$ git add .$ git commit --message "A guestbook"
Then connect the folder with the empty repository you created, and push. Replace your-name with your user name:
GitHub
$ git remote add origin git@github.com:your-name/guestbook.git$ git push --set-upstream origin main
This address uses SSH, so GitHub has to know your SSH key. If the push is refused, add your key to your account first: GitHub's guide shows how. Afterwards, reload the repository's page on GitHub: your files are there.
GitLab
$ git remote add origin git@gitlab.com:your-name/guestbook.git$ git push --set-upstream origin main
This address uses SSH, so GitLab has to know your SSH key. If the push is refused, add your key to your account first: GitLab's guide shows how. Afterwards, reload the project's page on GitLab: your files are there.
What you have now
A small app with a database, a migration, a test, and a repository to push to. It runs on your computer, and so far only there. Before it can be swapped without a gap, it has to learn two things that every deploy will ask of it: to say whether it is ready for visitors, and to finish its work before it leaves. That is the next part.
Comments
The comments are GitHub Discussions: sign in with GitHub to write one.
The comments come from GitHub, through giscus. Loading them sends your IP address to giscus.app and GitHub.